Before you send a document, export to PDF, send a spreadsheet, or even send an email, there’s an easy way to check if it’s accessible using Microsoft Office. Almost every application in Office comes with an accessibility checker built right in.
Even older versions have the tool, but it’s buried more. This post covers how to do it in new versions of Office, such as Office 2019 or Microsoft 365 (the new name for Office 365).
Before releasing or sending any Office file, take a few minutes to run the accessibility tool and see what you can do to improve its accessibility. It won’t take long, and it gives you good tips. While it’s not entirely comprehensive in accessibility suggestions, it’s a great start and good enough for most.
If you want more information about Word accessibility, check out the Word Document Accessibility Checklist on our resources page.
But if you want the basics for everything else, check out the accessibility checker in Office. If you didn’t know it was there, you’re not alone. While it has been there for quite a while, it was buried until around 2019 and is now easier to find in newer versions of Office. Unless you have a disability, you may never know the issues of accessibility. But you should!
Everyone should be more aware of the accessibility tool. It’s a simple way to make your content easier for everyone to access. And the need to use the tool applies to everyone (not just training professionals) because you can even check emails for accessibility when you send them in Outlook.
If you’re not convinced you should spend time making your content accessible, think again. Let’s consider why your content and training content should always be accessible.
Why All Training Content Should Be Accessible
If the content isn’t made accessible, people with disabilities are being told that their access to content doesn’t matter. That’s a bad message to send, but it is precisely what is indirectly being communicated.
It’s easy to say that people with disabilities take care of their ability to access the content. Many workplaces will accommodate them by providing special tools. Unfortunately, those tools won’t work well if people producing content don’t try to create accessible content.
Not to mention, there’s a whole group of people with disabilities who never even tell their work (would you want to with all the discrimination out there?). Something like color blindness or low vision may go unreported. That means specific accommodations for those people can’t be made, and therefore, they’ll suffer if something as simple as color contrast isn’t used.
According to the Center for Talent Innovations, 30 percent of college-educated employees working full-time in white-collar professions in the U.S. have a disability. However, that same study found that only 21 percent of employees with disabilities disclose them to their employers’ human resources departments.
Only 21% of employees with disabilities disclose them to their employer.
Center for Talent Innovations
That’s a lot of people who are unaccounted for and have various disabilities to varying degrees. Employers can’t assist those employees if they never know about them. That means they must suffer silently if they don’t feel comfortable reporting that they need assistance.
Just like we make accommodations in the workplace for many reasons, including all employees collectively, we should do whatever possible to make all training content accessible.
Then there are legal considerations. Not every private organization is vulnerable to legal action for not providing accessible content. Still, nearly every organization that takes money from the government and provides anything to the public is typically required to make content accessible.
In training, we must make content accessible because it has such an extensive reach. Office makes it easy to check accessibility; you can even check PDF accessibility with Adobe Acrobat.
How To Check If Content Is Accessible
Training professionals use many applications with tools built into them to make checking accessibility easier. Microsoft Office has a tool available in nearly every application in the suite, including OneNote and Outlook. If you have Adobe’s Creative Cloud, you can check content once it’s in PDF form using Adobe Acrobat.
Checking if content is accessible is mostly the same for Mac and Windows except in the case of Outlook. Outlook for Mac has a different way of checking accessibility. These screenshots are primarily from a Mac, so you may notice subtle differences, but overall, the process is the same.
Let’s review how to check if your PDFs are accessible first.
Check If Your PDF Is Accessible
This one requires Adobe Acrobat, which is not free, unfortunately. Many tools to create PDF documents include tools to make them accessible, so you don’t necessarily need to check the PDF unless you aren’t sure if your PDF is accessible. It’s not necessary to check Microsoft Office accessibility and also check the PDF, but the Office tool will help guide you as you create so the final PDF is more accessible.
Google Workspace is an excellent example of an application that has accessibility tools available. It just doesn’t have an accessibility checker that will verify the overall accessibility of your content. Google Workspace does let you add alt text to images, though. You can learn how to add alt text to make documents more accessible.
Here’s how to check the accessibility in Adobe Acrobat.
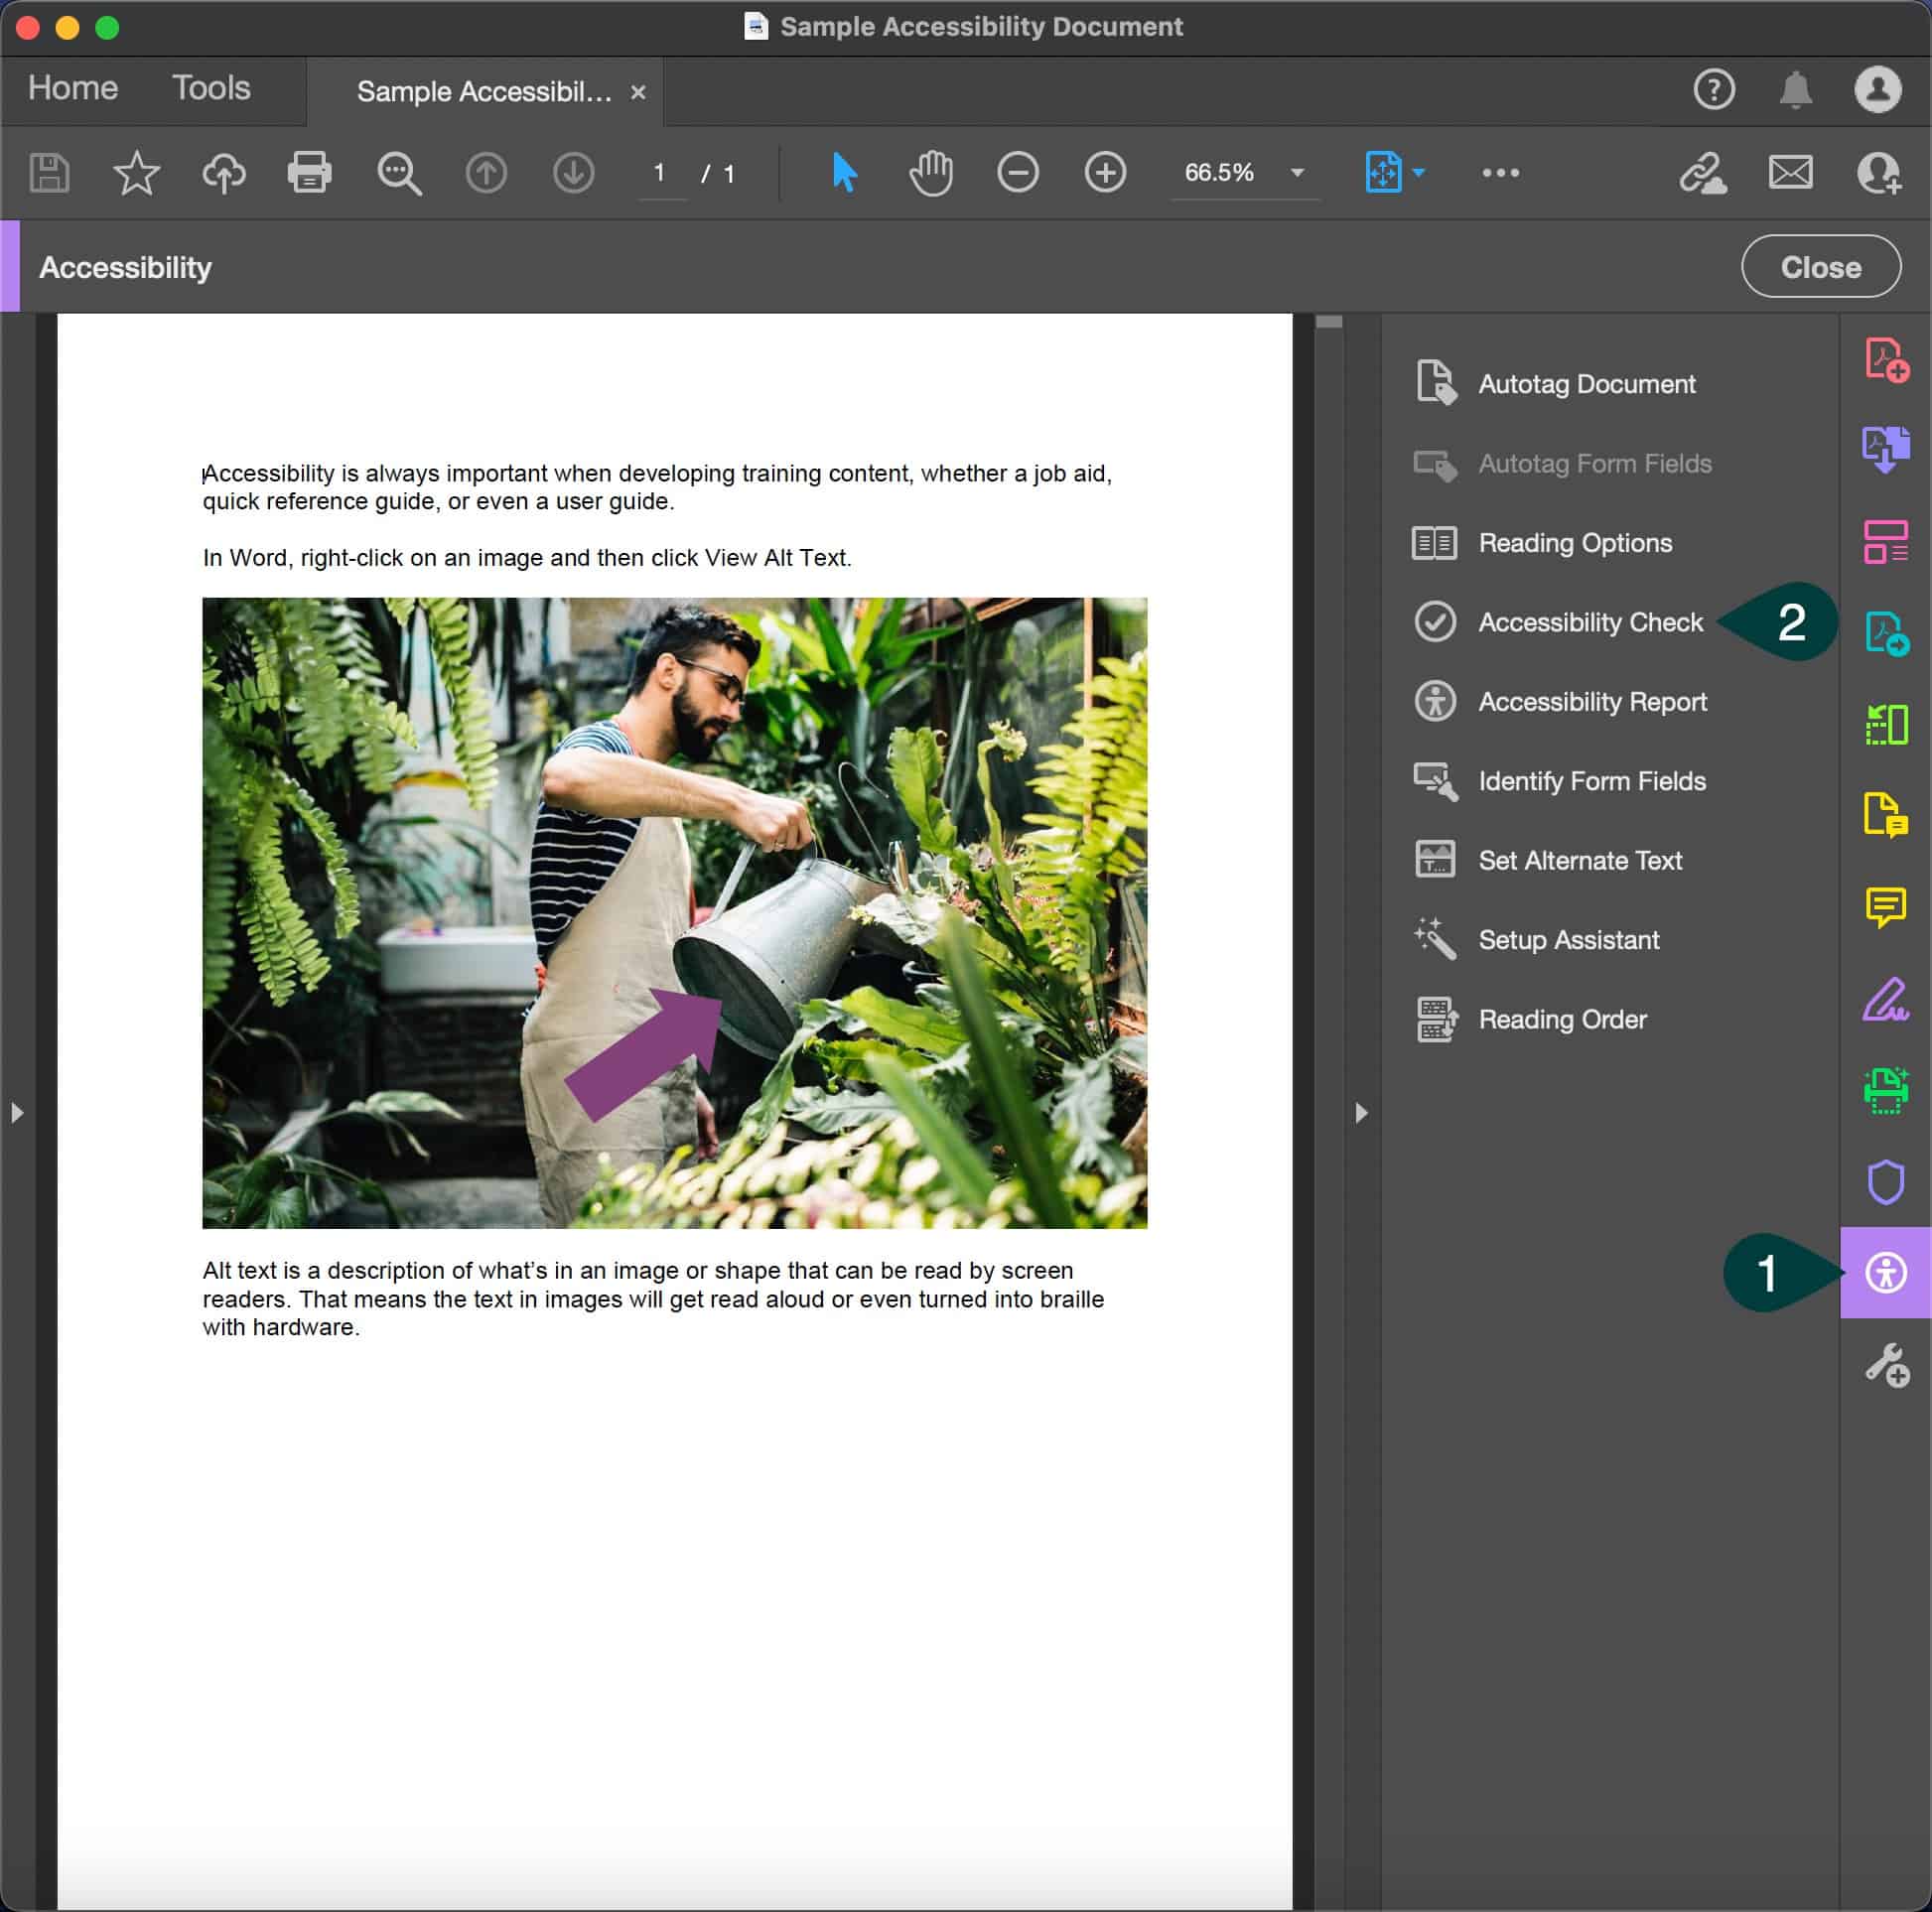
With your document open in Adobe Acrobat, Click the Accessibility icon (step 1) and then choose the Accessibility Check (step 2).
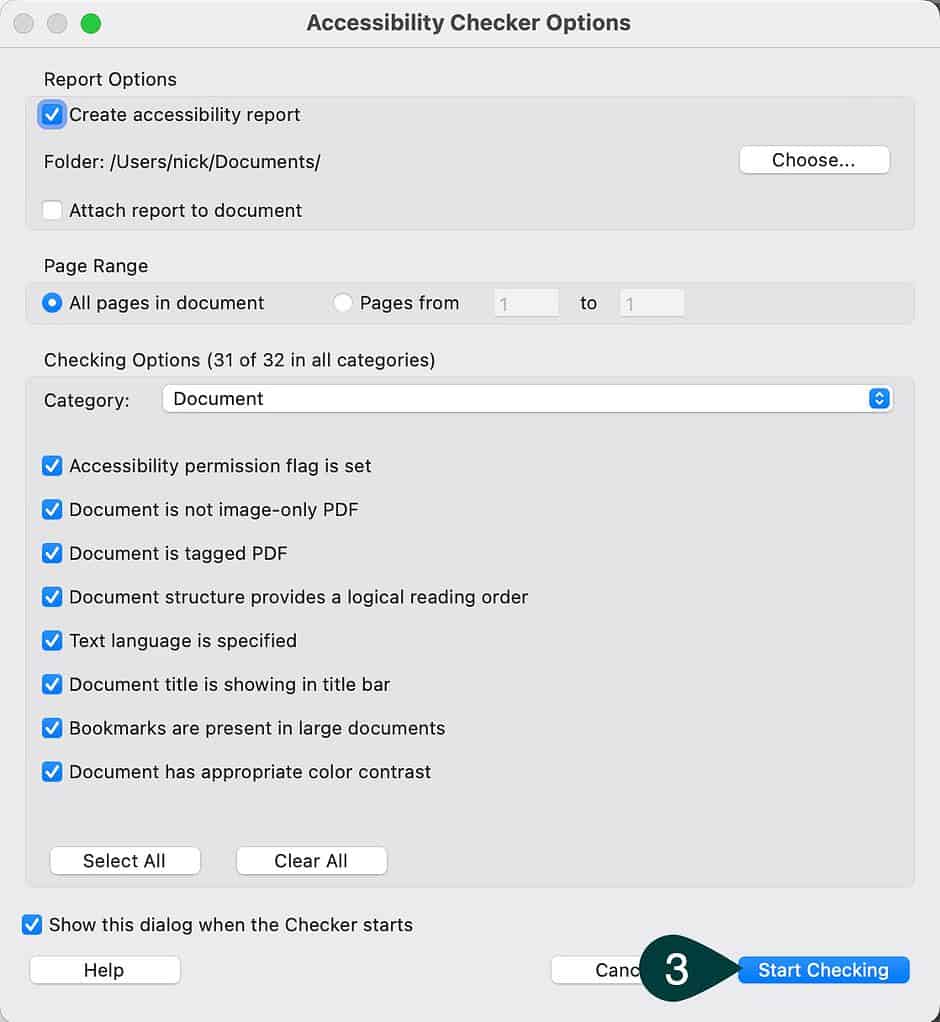
You can then choose which options to check and whether to attach the report to the document. Once you’re ready, click Start Checking (step 3).
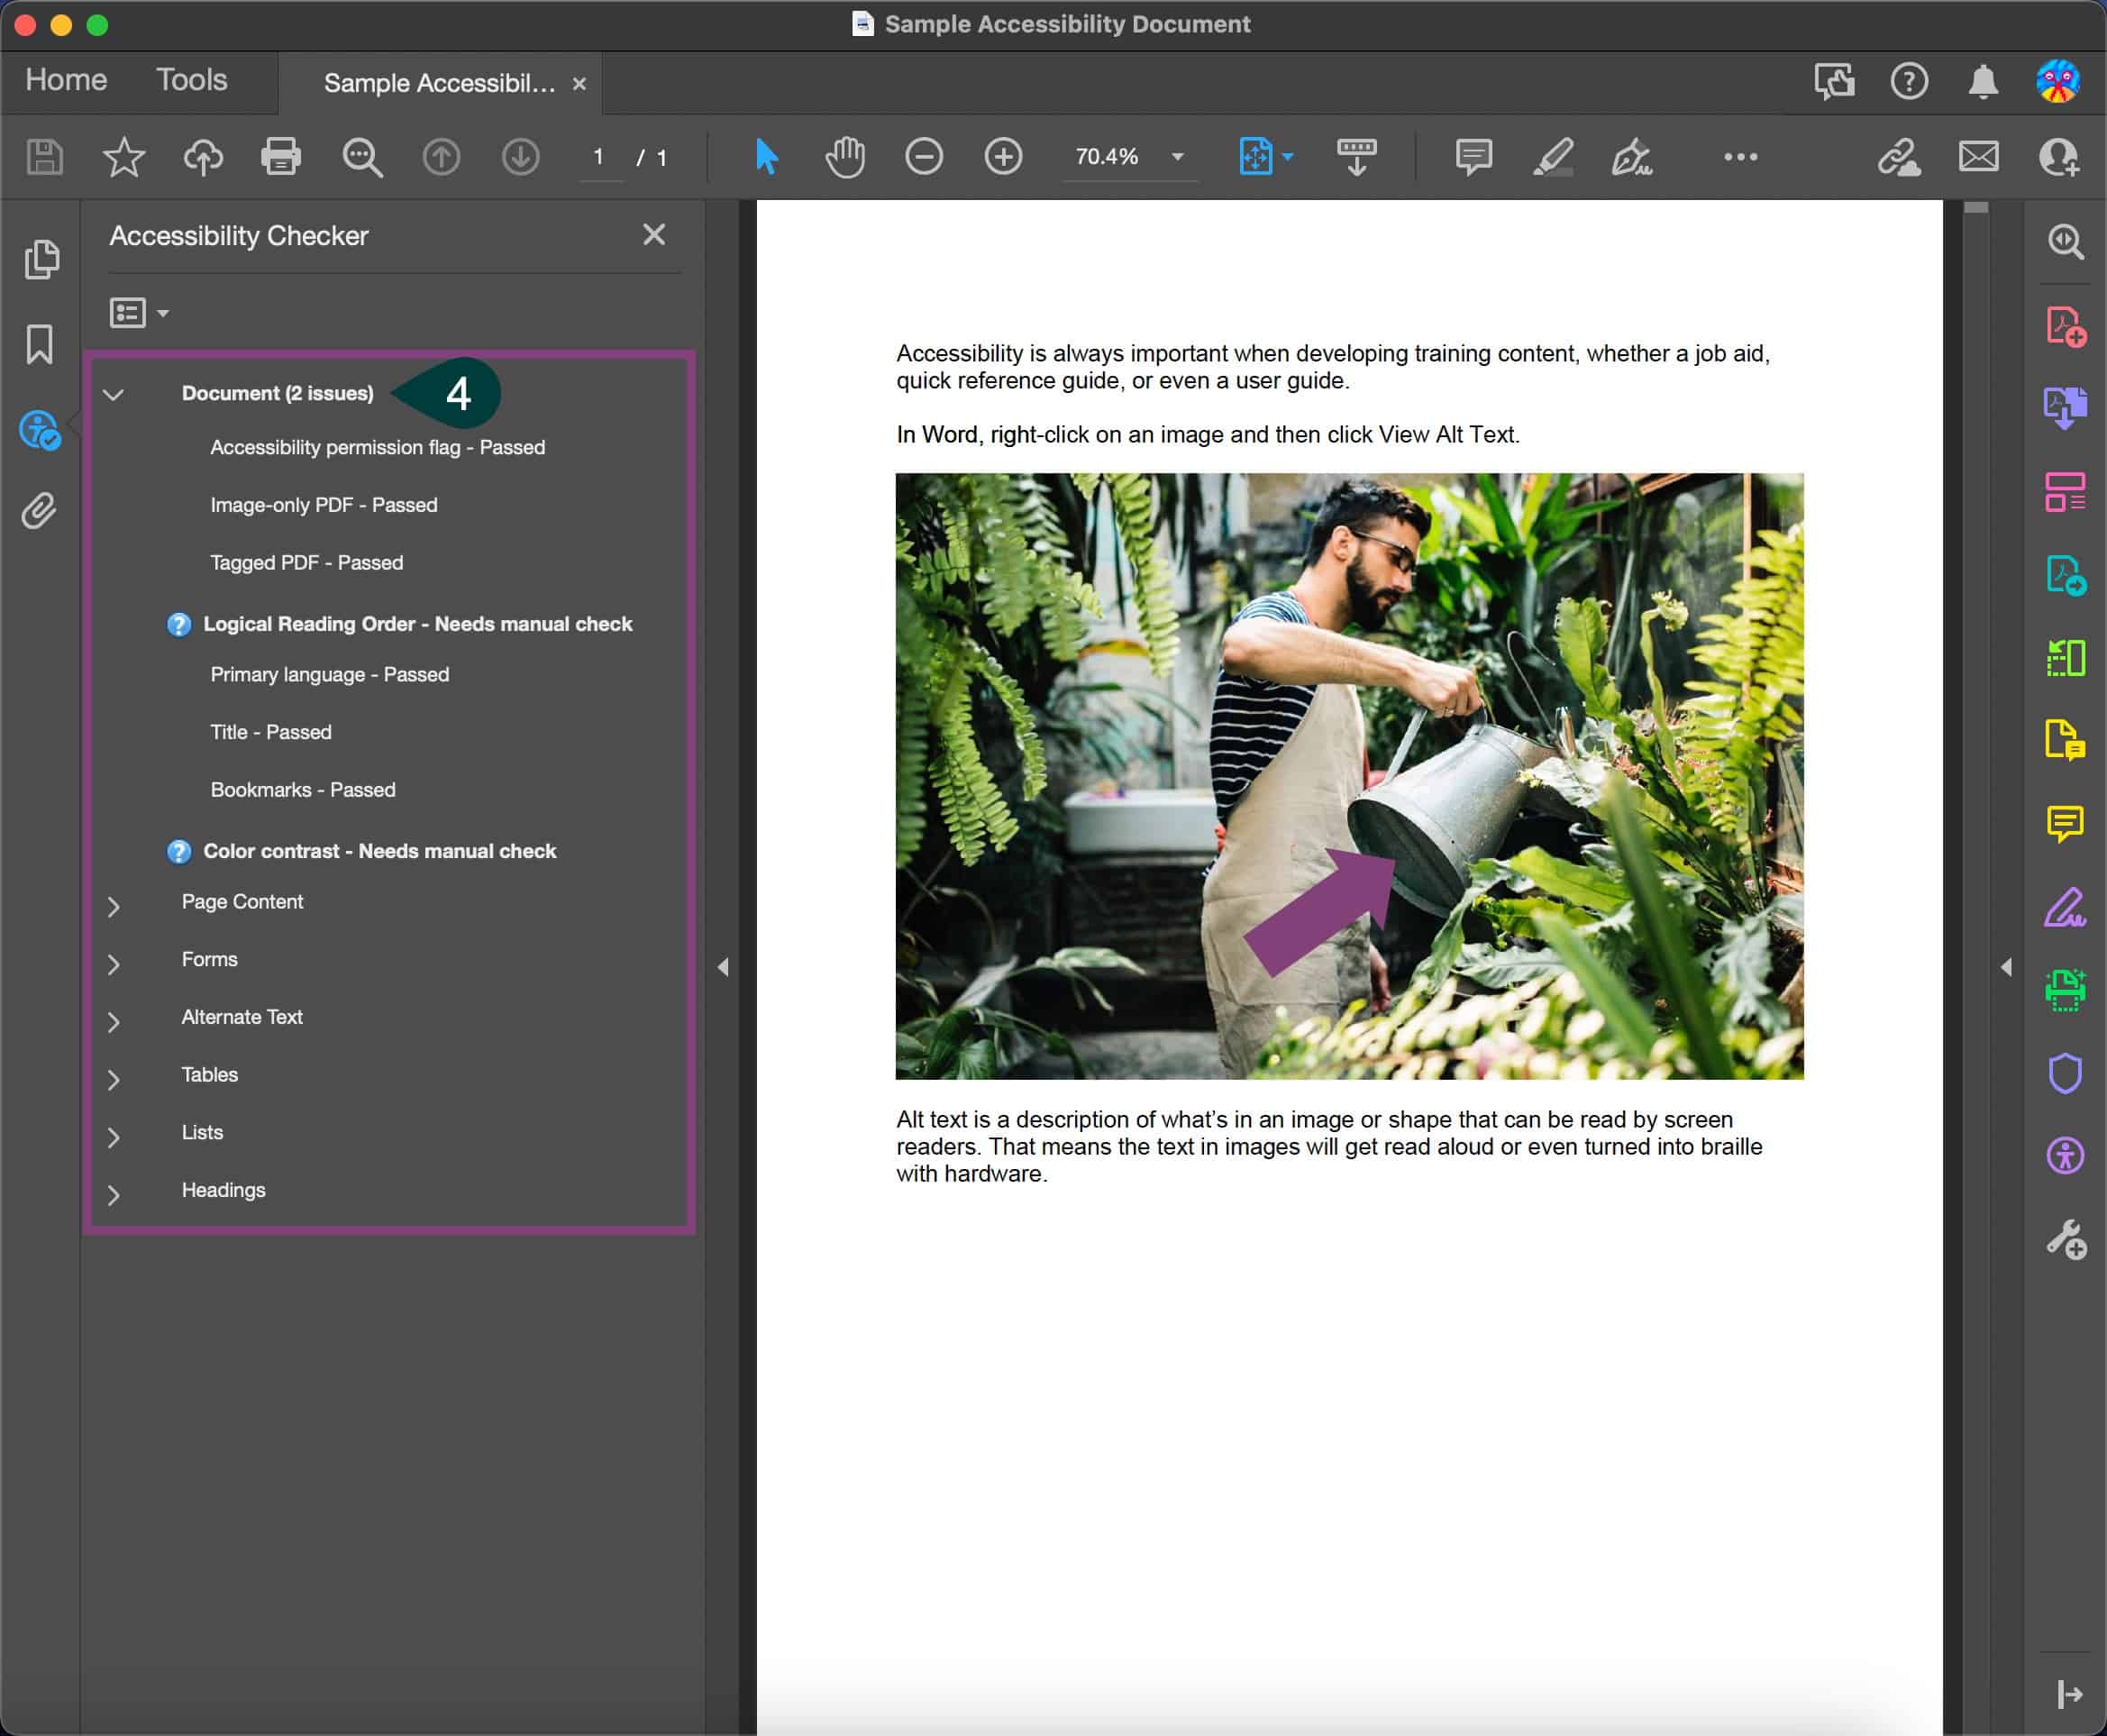
Now, you can see the report on a panel that opens up on the left side of Adobe Acrobat. It’s a detailed report that shows nearly everything that can be done for accessibility. It even includes things it can’t check automatically and lets you know what you need to check manually.
When you see a heading with issues, it will be bold and have the number of issues. Just click the heading (step 4), and it will expand with all the problems listed.
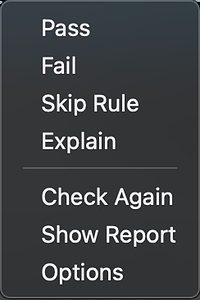
You can mark manual-check items as pass by right-clicking on any item and choosing pass. If you have an error with alternate text, you’ll also have the option to fix it when you right-click on the error.
When you choose the fix option for alternate text, Acrobat will open the alternate text box for the item that’s the issue so you can enter it in alternate text.
If you want to learn more about Adobe Acrobats’ features to check PDF accessibility, they have a document that details the verify PDF accessibility features.
Microsoft Office is next up and equally as essential as PDF accessibility.
Check If Microsoft Office Content Is Accessible
The accessibility checker is included in every newer version of Microsoft Office. If you have an old version, you may have to go into File > Info and then use the Check for Issues drop-down. After that, checking for accessibility works similarly, though.
If you’re using a new version, you’re in luck; Microsoft made the accessibility checker tool much easier to access and use.
You can check accessibility on nearly every type of content you create or send in Microsoft Office. That includes things like the following:
- Emails in Outlook
- Word documents
- Excel spreadsheets
- PowerPoint slide decks
- Nearly every Office application
Even OneNote has an accessibility checker!
Yes, OneNote has an accessibility checker that will check your contrast, alternate text, and other items to ensure accessibility.
Here’s how to use the accessibility checker in Microsoft Office. These screenshots are from Microsoft Word for Mac but are nearly identical in Windows.
First, click on the Review tab (step 1). Now click the Check Accessibility button (step 2) on the ribbon. These steps are the same whether using Excel, PowerPoint, or many other Office applications.

A few Office applications are slightly different, so you may have to look through the tabs. The one big exception we found is OneNote for Mac. For Mac, the Check Accessibility button is on the View tab, whereas for Windows, it’s on the normal Review tab.
In some Office applications, there’s also another quick option for seeing how your accessibility is doing and opening the checker pane. In Microsoft Word, look in the lower left of your document; you’ll see these icons that let you know how your accessibility is doing. It’s a button, too. Click it, and it’ll open the accessibility pane.

If something is wrong with your document, you’ll need to investigate it. Just click the button, making it super easy to troubleshoot your accessibility issues.

Once you click the Check Accessibility button, the Accessibility panel opens on the right side of the application. As in Adobe Acrobat, you can see all the errors, warnings, etc., and twirl them open by clicking the arrows or issue headings (step 3).
Now, you can click the issue (step 4), and you’ll see information about why you should fix it and how to fix it.
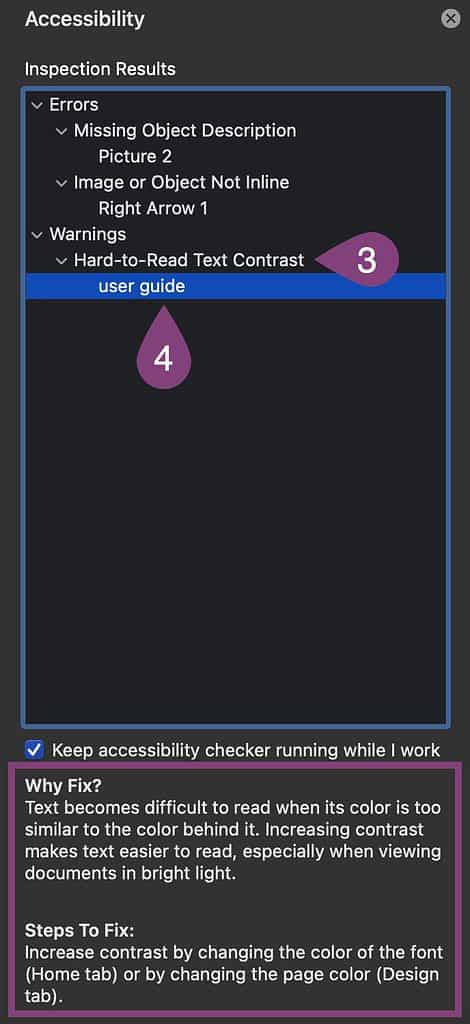
The great part is that when you click on different issues in the Accessibility panel, that item is selected in your document. Thus, you can easily make the suggested changes.
Be sure to check the accessibility of your email before you send it. This will help you put alternate text in, check color contrast, and make other accessibility checks. Before clicking send, go to the Review tab and click the Check Accessibility button.
If you’re using Outlook for Mac, the process is slightly different. There’s either a Check Accessibility button right on the mail you’re composing, or you need to add that button the first time.
Adding Check Accessibility in Outlook for Mac
If you need to add the accessibility checker on Outlook for Mac, here’s how.
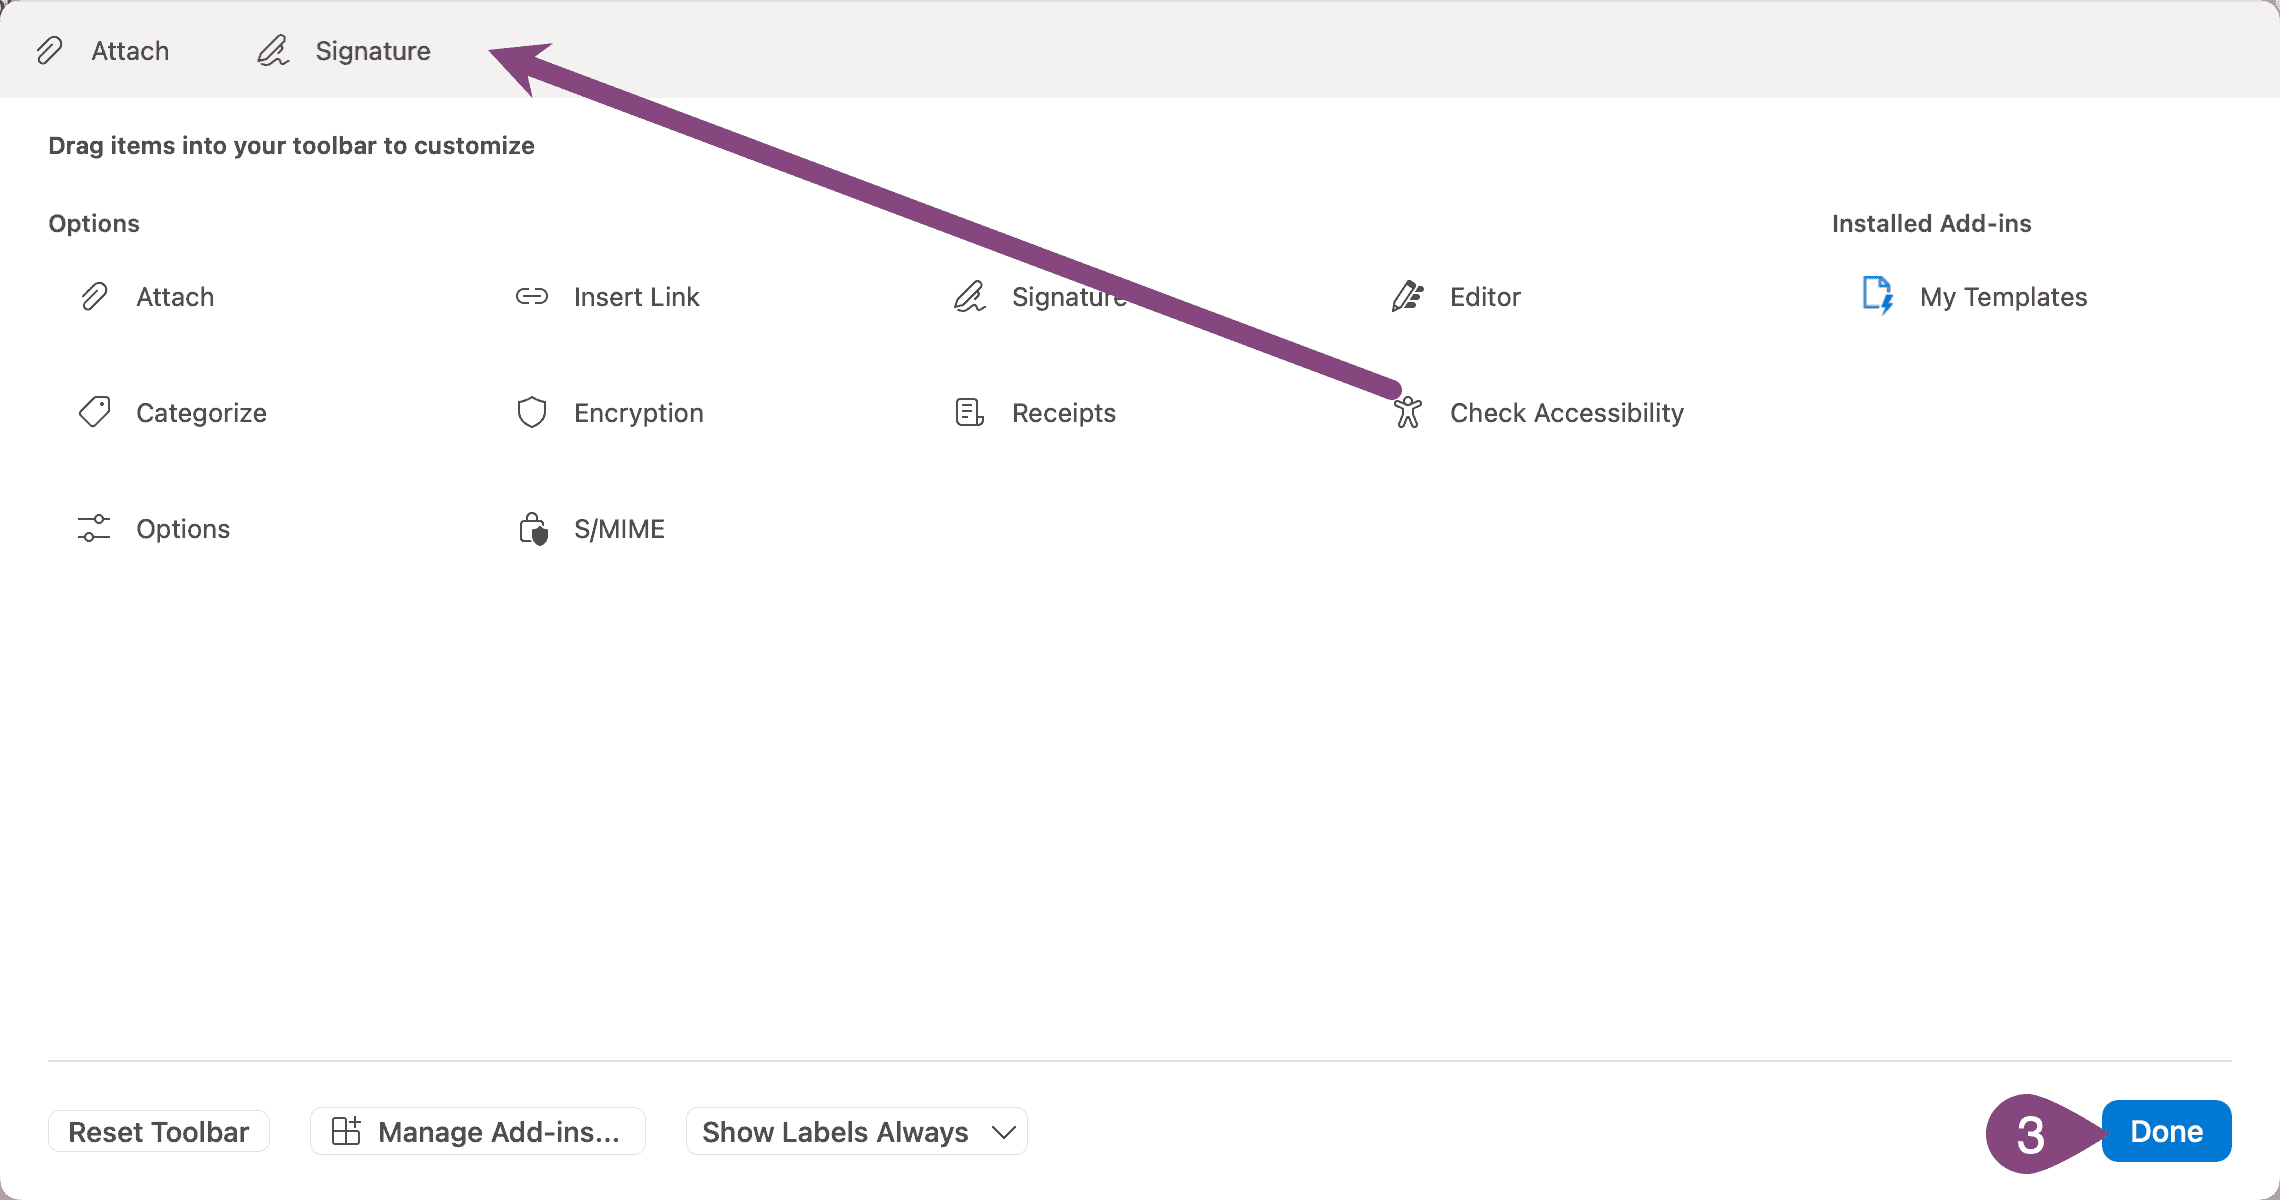
Click the ellipsis to the right of the buttons in your email draft (step 1) and then click Customize Toolbar… (step 2).

Now, you can drag the Check Accessibility button to the toolbar of your email so it will permanently show. You can also add other cool features directly to your compose email buttons. Once you’re done, click Done (step 3).
Now, look at that! You have the Check Accessibility button that you can click (step 4), and then you’ll get the Accessibility panel to the right of your email.
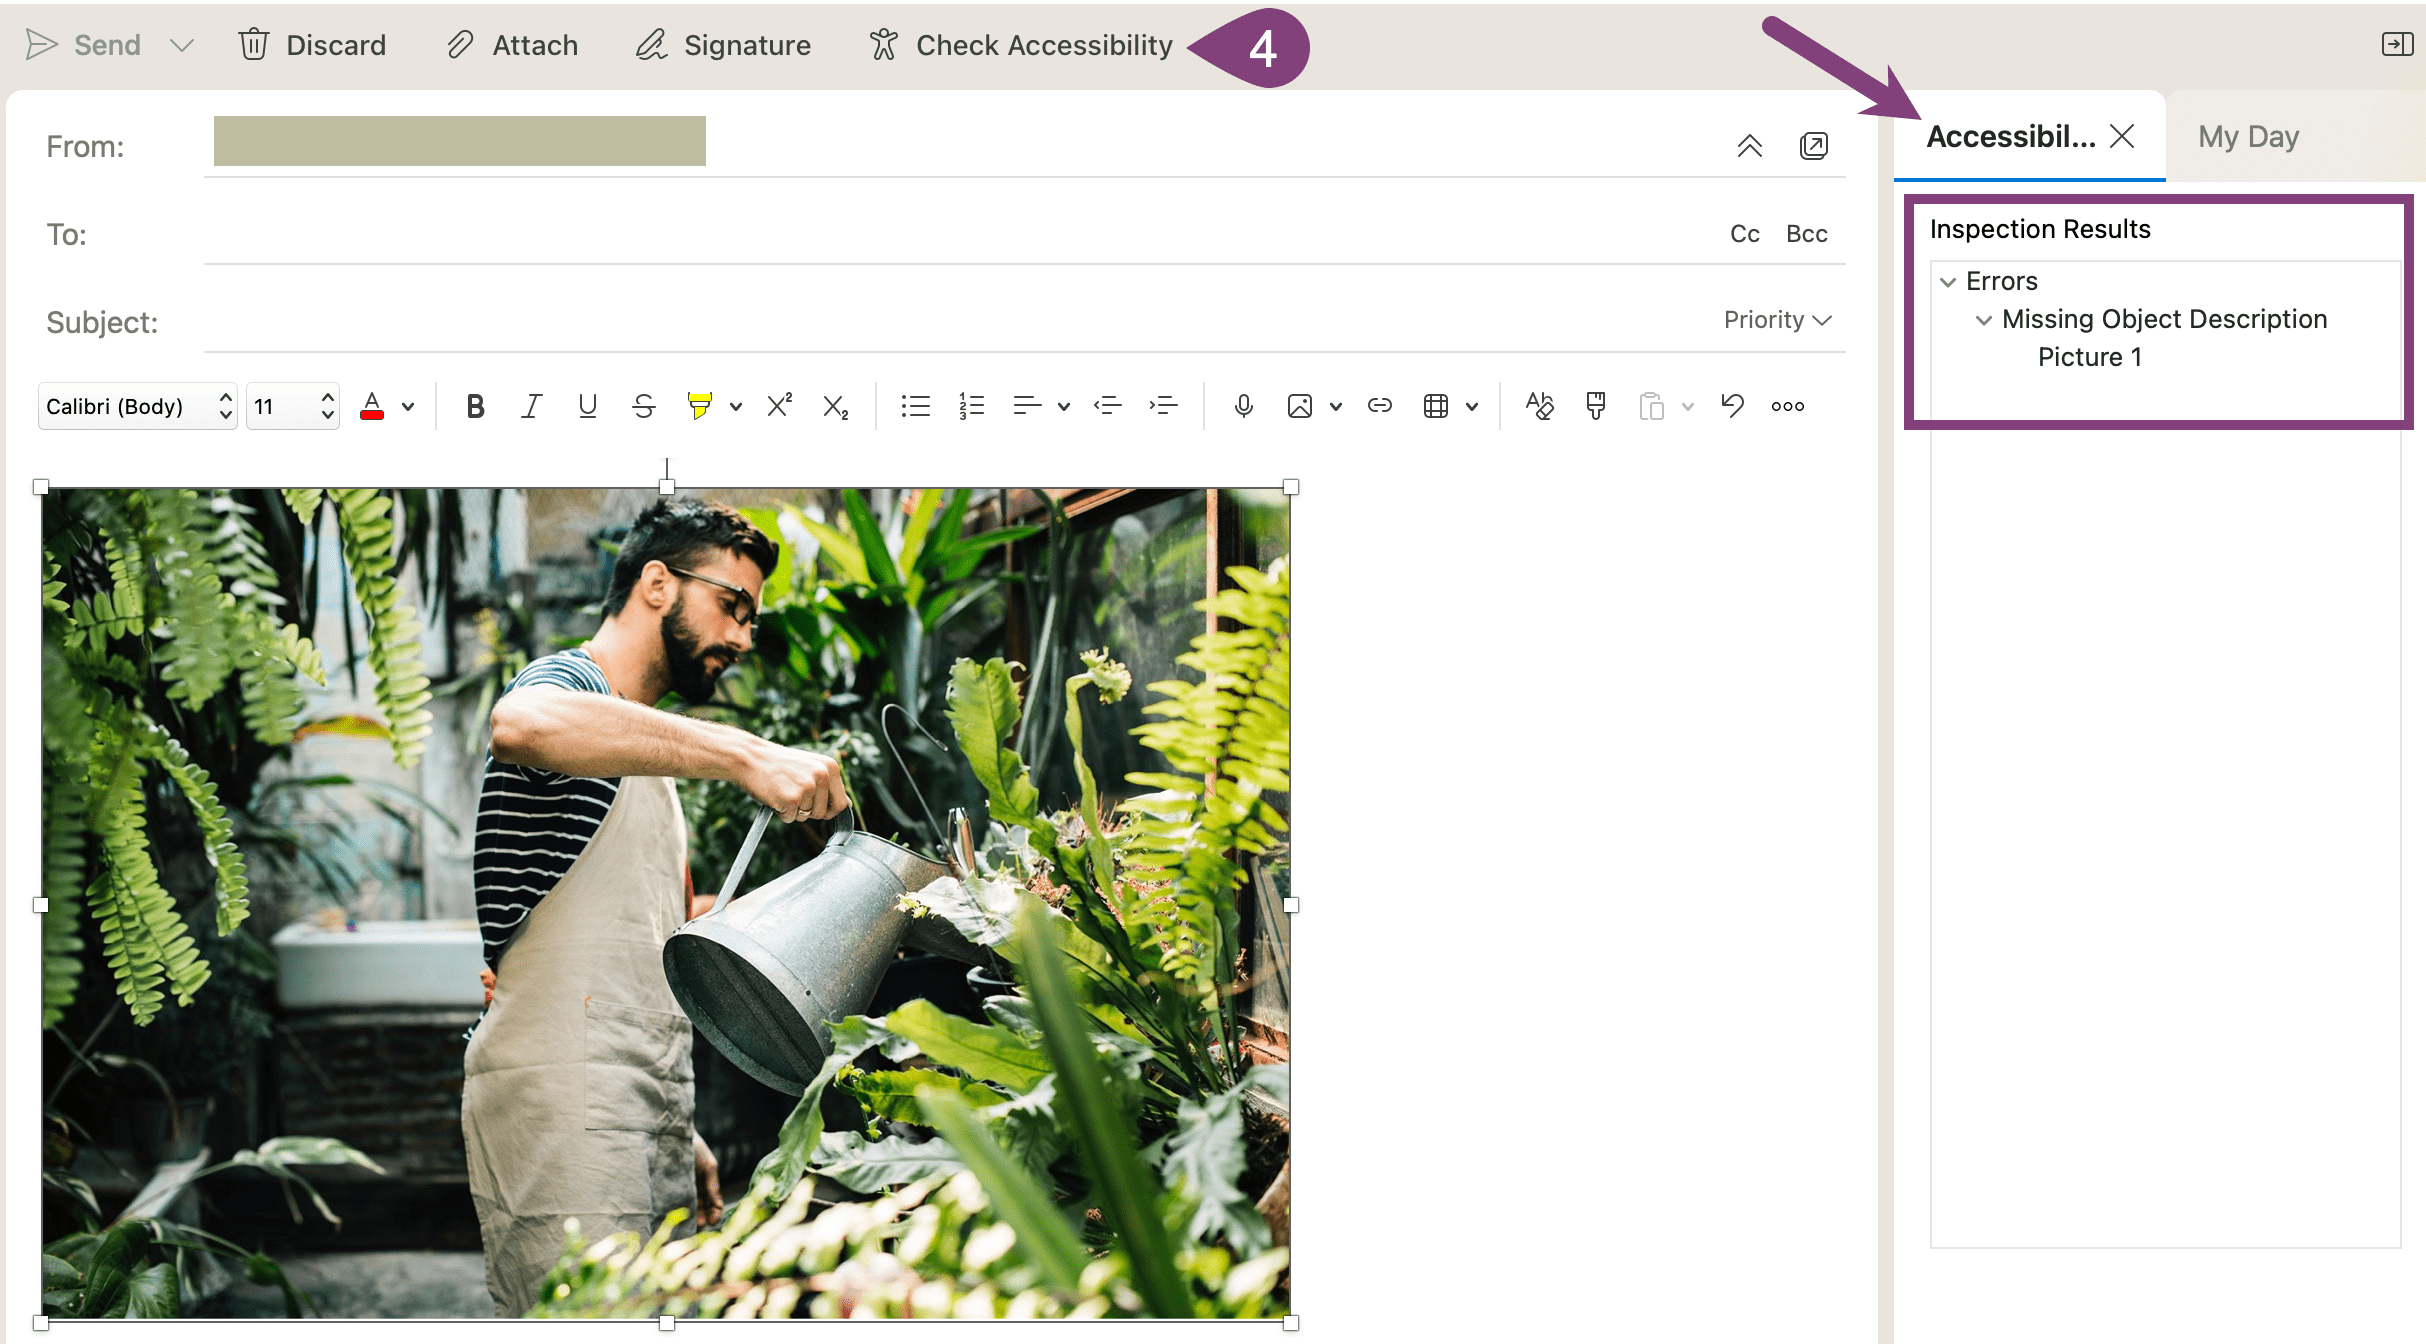
The accessibility checker in Outlook emails works the same way as other Office applications. Just click the issue, and it will highlight the item with the issue and tell you exactly how to fix it.
There are no excuses for ever sending out content that’s not entirely or nearly entirely accessible. It’s just a matter of getting in the habit of running the accessibility checker before you save, publish, or send content.
If you want to learn more about checking the accessibility of Microsoft Office content, check out the article from Microsoft about improving accessibility in Office.
How To Fix Issues
Microsoft Office makes it easy to fix issues because the accessibility checker lets you navigate around your content by clicking on the issue and gives you tips on how to fix it.
Some issues can be fixed directly in the PDF when checking in Adobe Acrobat. By right-clicking on any issue, there will be a fix option if you can fix it. Alternate text is easy to add to the PDF, and Acrobat can do it right in the application. However, not every issue can be resolved in Acrobat. Sometimes, you may have to go to the source file.
Do the best you can fixing accessibility issues. Fixing most issues is better than not fixing any.
Then, there is the possibility that you shouldn’t fix an issue. For instance, Word wants every object to be accessible in line. That makes sense because for screen readers to get the content right, everything must be in a specific order. If you require an arrow to be laid over the top of an image to point to something, you can’t make that arrow inline. That means the document can’t be fully accessible, or the content might not be helpful to anyone.
Sometimes, the best you can do is to fix as many of the issues that make sense. Fewer accessibility errors are better than not fixing any of them. Just do the best you can.
Fixing Accessibility Issues in Adobe Acrobat
This is an example of fixing alternate text in Adobe Acrobat. In the accessibility checker, right-click on the alt text failure option (step 1) and then click Fix (step 2).
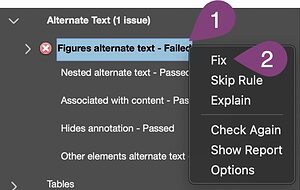
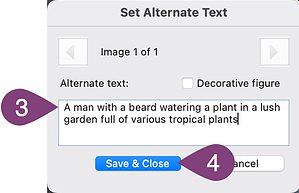
You can then navigate through all the alt text issues with the right and left arrows, enter the alt text (step 3), and click the Save & Close button (step 4).
Every accessibility issue will have a different way to fix it. Acrobat also has an option that explains the issue if you need more context to get the issue fixed correctly.
Fixing Accessibility Issues in Microsoft Word
We wrote an entire article on adding alternate text to images and objects in Microsoft Word. That’s the best reference for instructions on adding alt text, which you can also do in Google Docs.
If you want to go beyond the accessibility checker and create documents accessible from the ground up, we put together a thorough post to make Microsoft Word documents highly accessible.
Other accessibility issues will have different instructions. The accessibility checker provides instructions on resolving issues as you click on them.
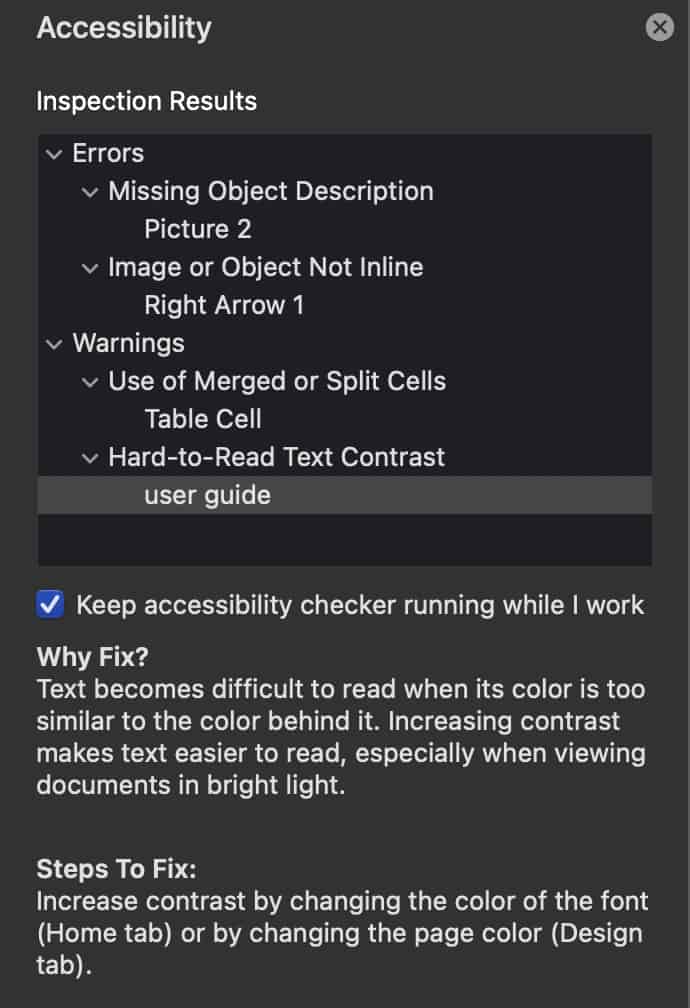
In Word, it tells you why you should fix this issue with color contrast and how to do it. Most problems are relatively easy to fix, so it’s worth using this checker, fixing those that can be fixed, and learning more about accessibility while you’re at it.
Wrap Up
Accessible content isn’t as hard to create as it may seem. Now that you know the importance of it and how easy it is to check and fix, more of the training content you create should be accessible.
Checking content is easy in Microsoft Office and Adobe Acrobat. Fixing most issues only takes a short amount of time. The most challenging part is finding something helpful to write for alternate text. It all comes down to writing what’s useful.
Even your emails can be accessible with a simple check, and Microsoft tells you how to fix the issues. However, beyond Office and PDF documents, more training content should be created to be accessible. There’s always video accessibility and developing accessible eLearning courses, too.
When we develop training that helps employees use workplace technology, we always build accessibility into our process so that everyone can use it equally.
If you’d like to learn more about how we can use company tech to help employees do their jobs better, schedule a free consultation so we can discuss working together and helping your project succeed.
